DESCRIPTION OF INTEGRATION WITH ONLINE STORE PRESTASHOP
The necessary tools to create a website:
- Install the program for selection of spare parts (the path to the program)
- Required parameters hosting and desirable changes
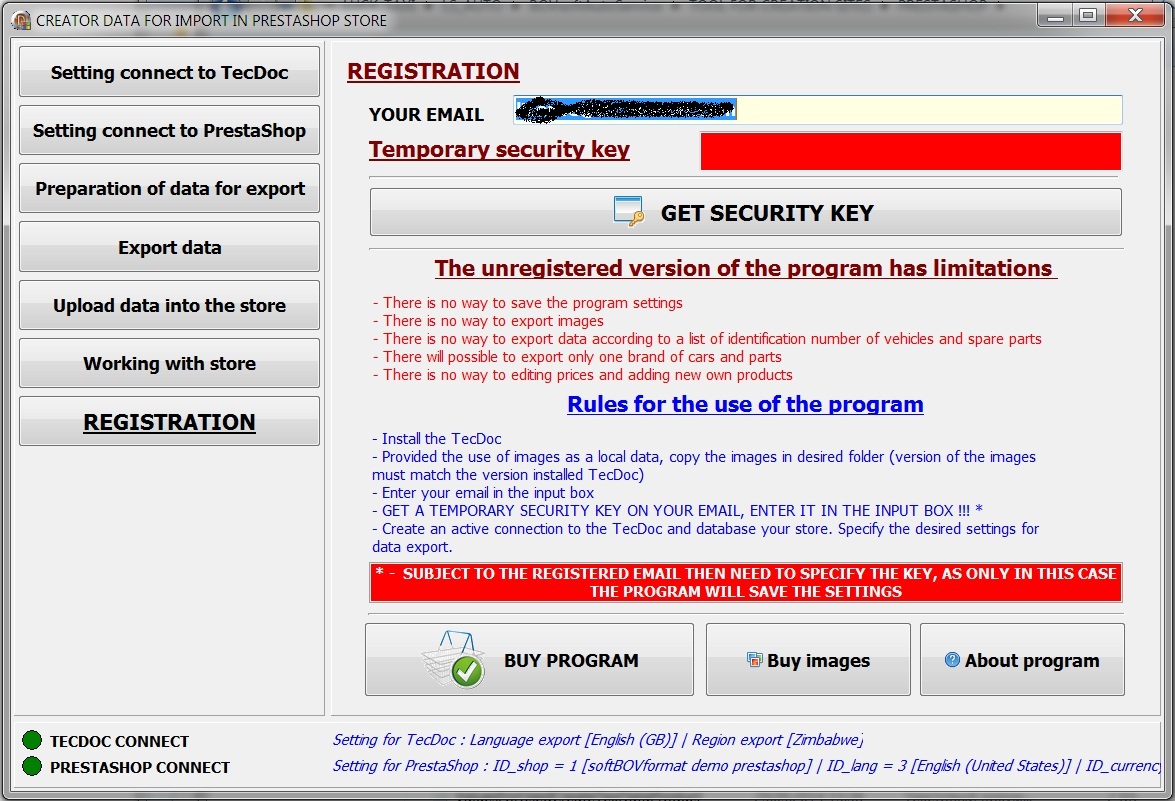
Page REGISTRATION
Panel for enter of registered your email for works with program and for enter of temporary security code that will come to your email.
Panel for enter of registered your email for works with program and for enter of temporary security code that will come to your email.
Processing to price list
Connecting price list for processing
Processing to price list
Connecting price list for processing
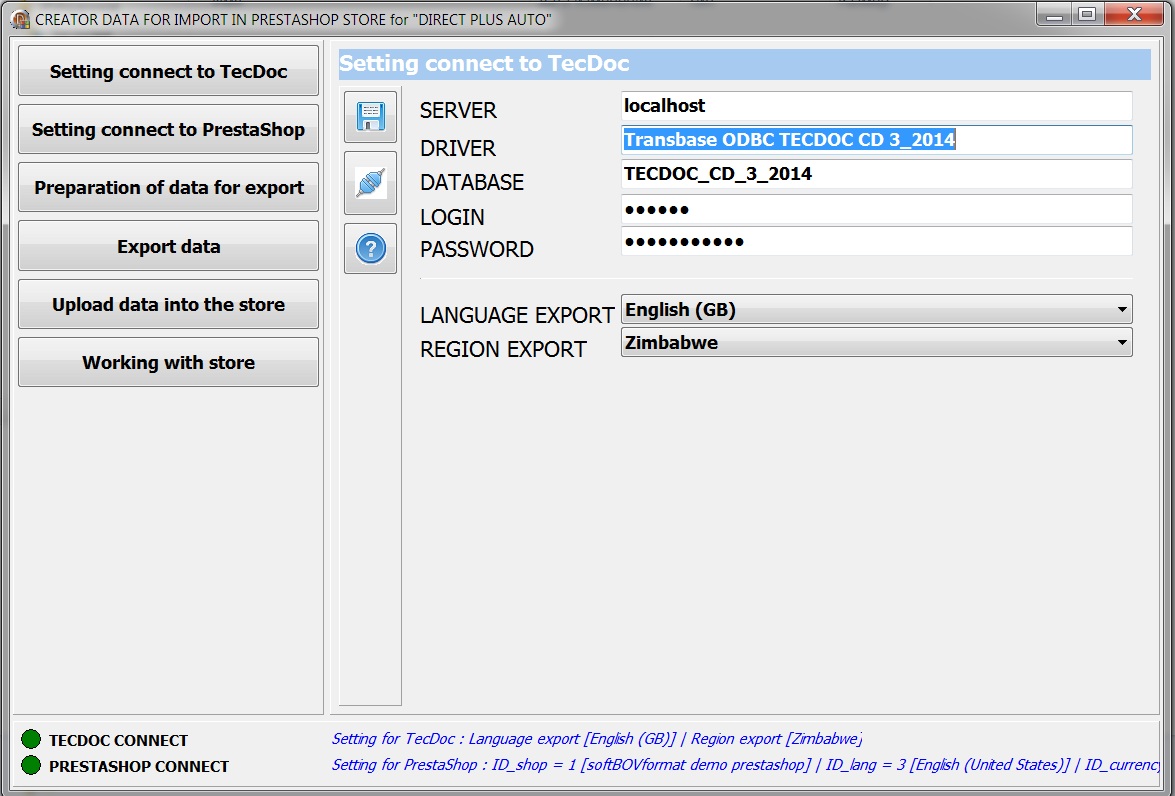
Page SETTING CONNECT TO TECDOC
Panel for enter of settings for connecting to TecDoc, if the program does not automatically find those data
Panel for enter of settings for connecting to TecDoc, if the program does not automatically find those data
Processing to price list
Connecting price list for processing
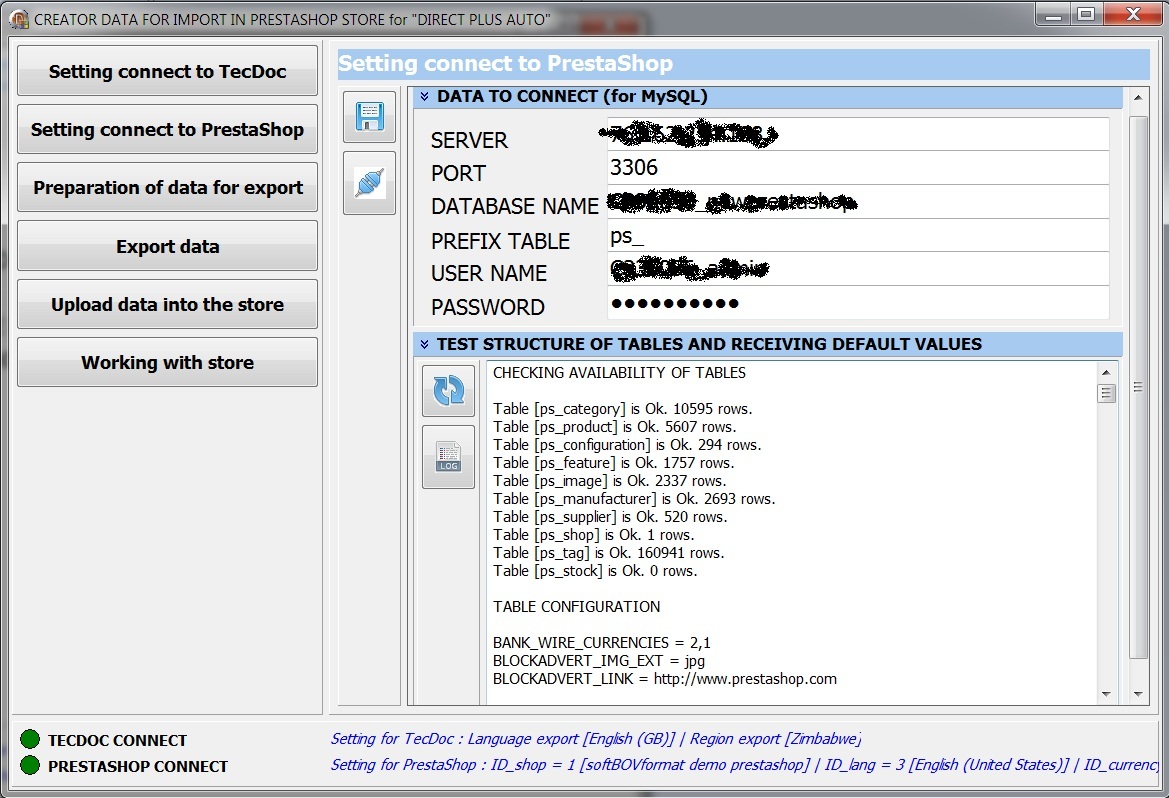
Panel SETTING CONNECT TO PRESTASHOP
Panel for enter of settings for connecting to PrestaShop store.
Panel for enter of settings for connecting to PrestaShop store.
Processing to price list
Connecting price list for processing
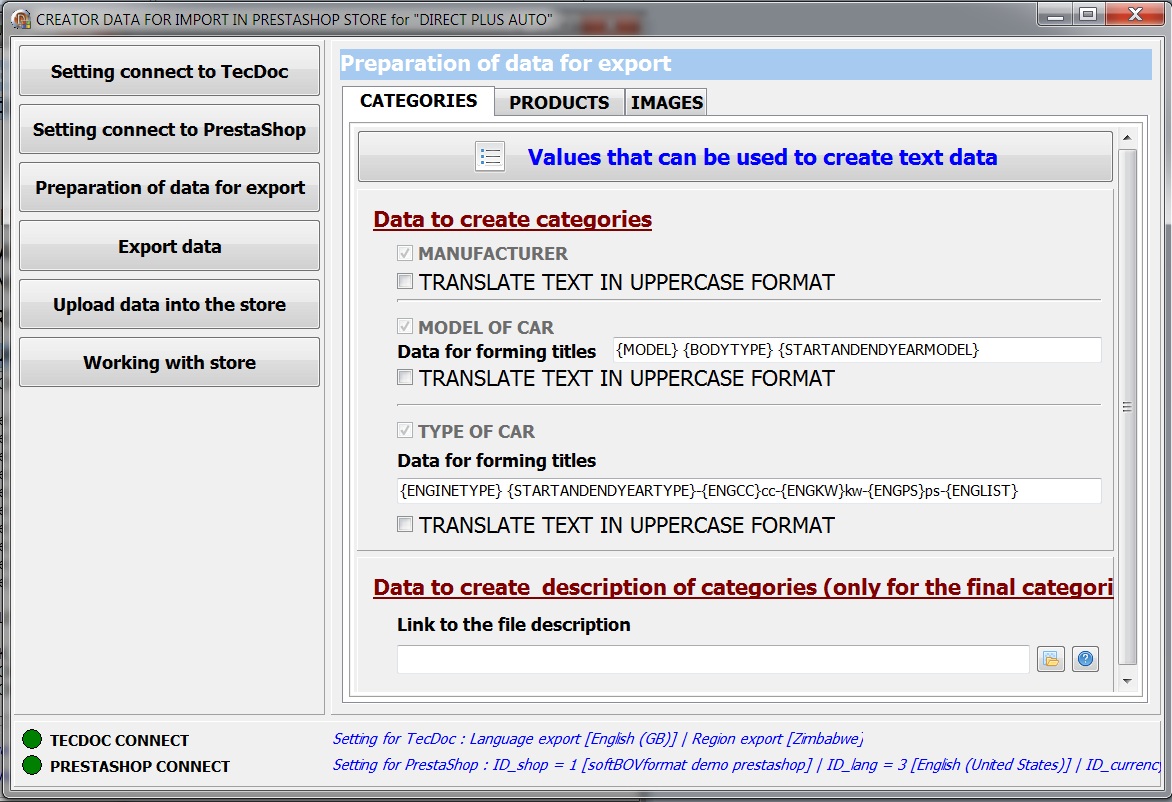
Panel PREPARATION OF DATA FOR EXPORT
Panel for enter of settings for generate names, descriptions, criteries, tag-links and export of images and etc ...
Panel for enter of settings for generate names, descriptions, criteries, tag-links and export of images and etc ...
Processing to price list
Connecting price list for processing
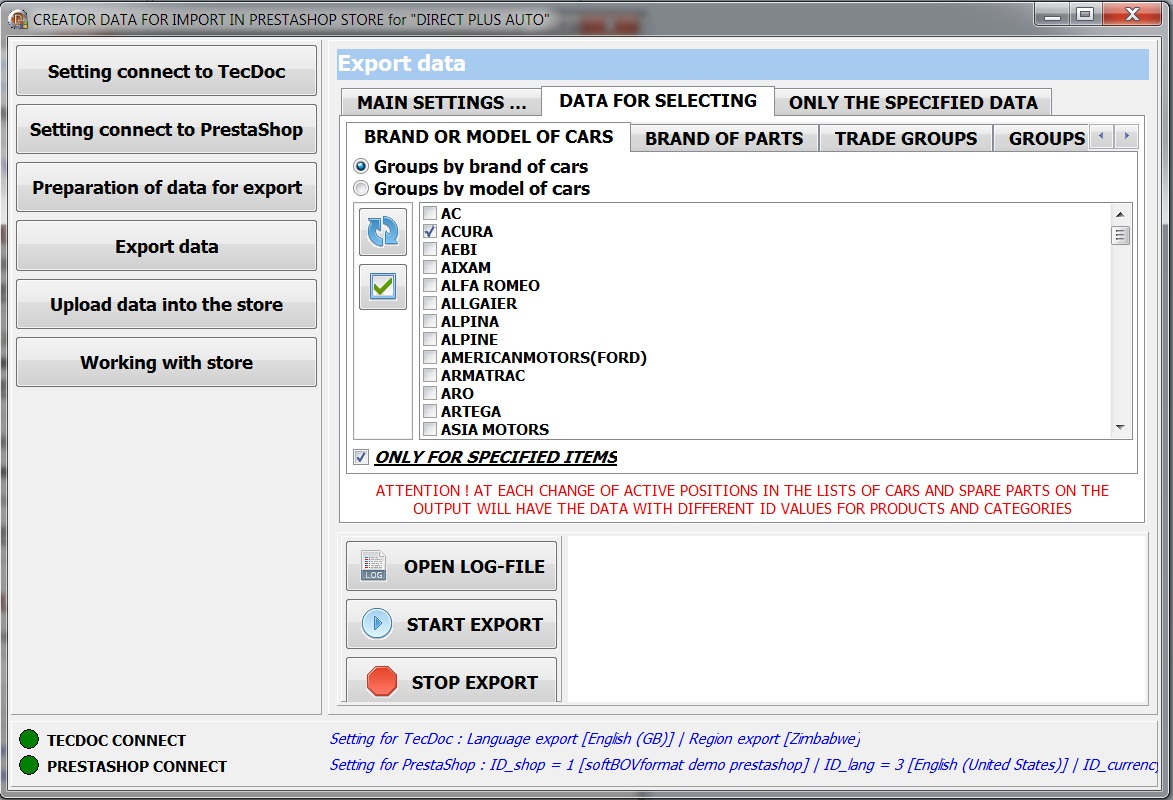
Panel EXPORT DATA
Panel to select the needed brands of cars and spare parts
Panel to select the needed brands of cars and spare parts
Processing to price list
Connecting price list for processing
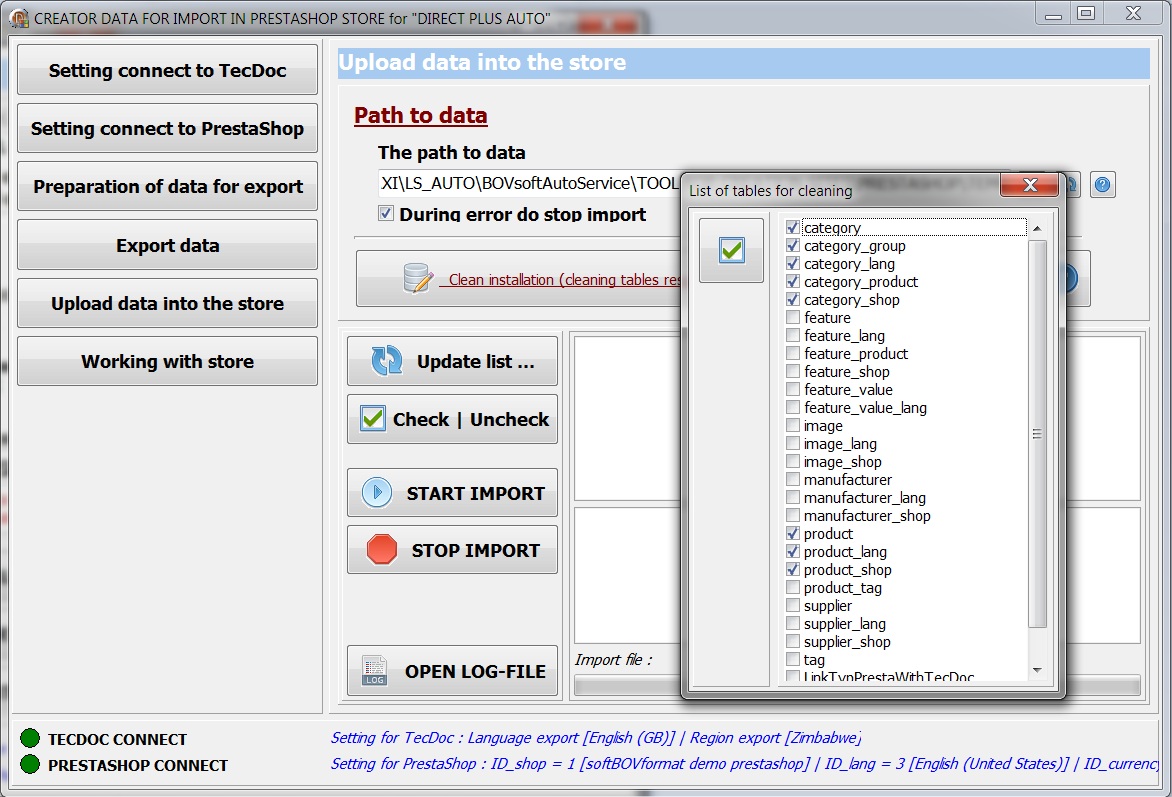
Panel UPLOAD DATA INTO THE STORE
Panel to select the needed files to import into the store
Panel to select the needed files to import into the store
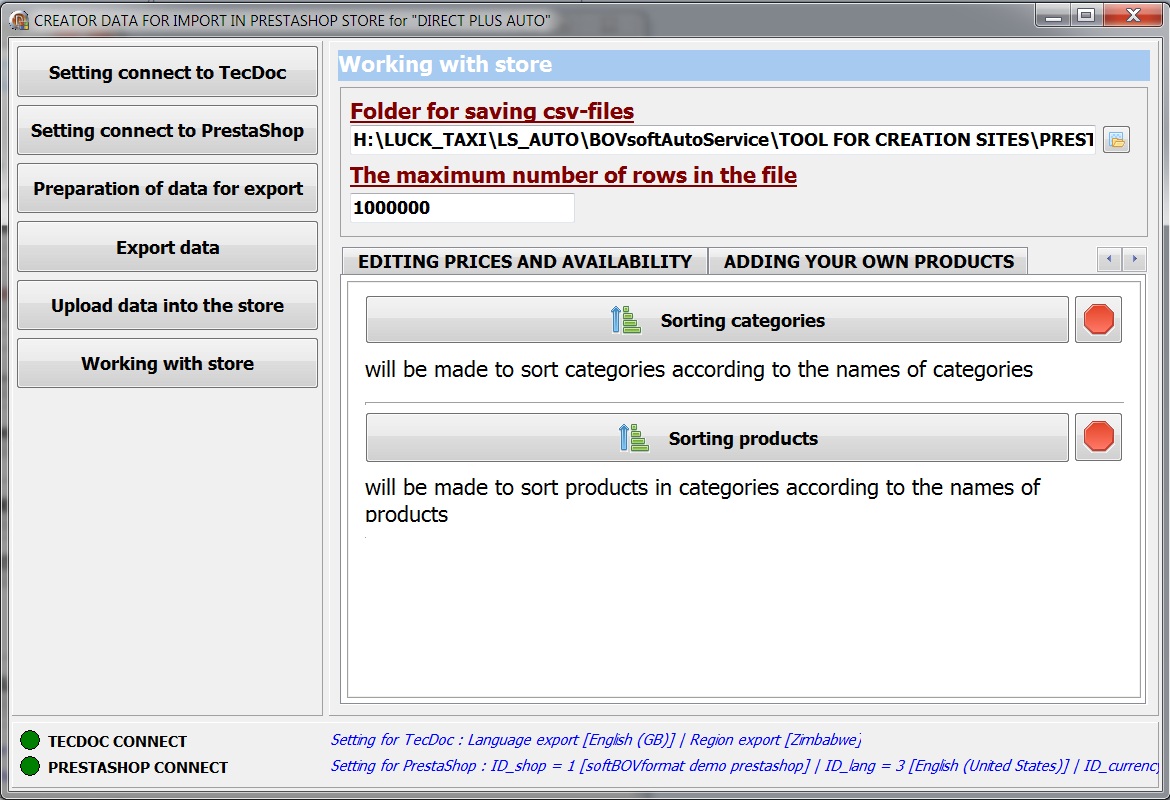
Panel WORKING WITH STORE
Panel with features: sorting of categories and spare parts, modify of prices and availability, the ability to add your own products
Panel with features: sorting of categories and spare parts, modify of prices and availability, the ability to add your own products
Processing to price list
Connecting price list for processing
THE INTEGRATION PROCESS
1. Install PrestaShop store.
2. Install program "CREATOR DATA FOR IMPORT FOR PRESTASHOP"
3. Run program. After each start of the program in the field "Temporary security key" need to specify a temporary key (the key will get on email only for registered users), that will give the ability to save all of the settings of the selection of brands cars and parts after closing the program. In demo mode (without temporary key) settings are not saved
...
... continued THE INTEGRATION PROCESS
4. Setting connect to TecDoc. Provided that you has installed TecDoc, program will
automatically find all the settings for the connection. If there are errors in the registers and
automatic connection does not happen, you can manually specify the desired settings and
save them to connect, for example :
Server : localhost
Driver : Transbase ODBC TECDOC CD 4_2014 (where 4-2014 this is version TecDoc)
DATABASE : TECDOC_CD_4_2014 (where 4_2014 this is version TecDoc)
LOGIN : tecdoc
PASSWORD : tcd_error_0
... also if you have a 64 bit system, you need to create a connection to the database driver
manually with help program "C:\Windows\SysWOW64\odbcad32.exe". See example of setting.
To specify necessary for you the language and the region exports
...
... continued THE INTEGRATION PROCESS
5. Setting connect to database PrestaShop store. Specify the necessary settings for the connection to your database. Save and make a test connection. Upon successful connection you will be shown all the settings of your store.
...
5. Setting connect to database PrestaShop store. Specify the necessary settings for the connection to your database. Save and make a test connection. Upon successful connection you will be shown all the settings of your store.
...
... continued THE INTEGRATION PROCESS
6. Preparation data for export
----
Data of categories :
On this tab, you can customize the format and structure of the category names and a
description of the category of the vehicle to display in the store.
----
Data of products :
On this tab, you can customize the format and structure of the product names and a
description of the parts to display in the store. Also there is a possibility to specify some
default settings for data which will export, for example : substitute the parameter data of
parts from TecDoc, catalog structure, whether to create an additional catalog for trade
groups
----
Images :
On this tab, you can specify the path to the program (by default is IrfanView) that will
convert images and the principle arrangement of images (directly from TecDoc, or from
folder with images that were previously exporting with help program "CREATOR DATA FOR SALE OF
AUTO PARTS" or or purchased separately) for the conversion to the correct format store.
...
... continued THE INTEGRATION PROCESS
7. Export data. On this tab you need to specify the path to the folder where program will save
the data and images for upload in PrestaShop store. Specify the required for you the brands
of vehicles, spare parts and if you want then can specify trade groups or categories. You can
also do export data only for list of vehicles and spare parts that can be specified on the tab
"ONLY THE SPECIFIED DATA". Press button "Export data".
Will be created sql scripts to populate data to your store. Also will created two additional
tables :
LinkTypPrestaWithTecDoc - links id_category to Ktype vehicles
LinkArtPrestaWithTecDoc - links id_product to Art_id from TecDoc
... and will be added column "id_manufacturer" to the table "tag" (this table will play the role
table of cross-references numbers).
Folder with images ("m" and "p" or "p_from_bovsoft") that will be created will need to be
placed in a folder of your store "/domainyourstore/img"
...
... continued THE INTEGRATION PROCESS
9. Working with store. On this panel, you have the opportunity to :
- Sorting categories
- Sorting products
- Editing prices and availability
- Adding your own products
...
9. Working with store. On this panel, you have the opportunity to :
- Sorting categories
- Sorting products
- Editing prices and availability
- Adding your own products
...
... continued THE INTEGRATION PROCESS
8. Upload data in store. After the creation of all the necessary data, these files can be uploaded directly into the database store. Also on this panel, there is a button to prepare this database to import (in the case created data for clean database store) - it's cleaning all the tables which specified in the list.
...


